Tuesday, July 11, 2023

DOCTOR! The Calculator is Terminal!! The C++ variety ;)


 Hello, and Welcome to my Blog! 

If you're a returning visitor, ...Hello Again!


Quote of the Week:

..but fear itself isn't worthy of our concern. It is who we become while in its clutches.

-RWBY

This week I wanted to jump back into C++ with a relatively straightforward program. There are no pointers or anything fancy. I just needed a breather as I am currently studying the Django and React frameworks.

The calculator has five main capabilities. The regular addition, subtraction, multiplication, and division are included. However, the fifth is called "E," meaning "end." It allows you to smoothly end the application. I have also used cin methods to prevent garbage data from crashing the terminal calculator.

Here's the code below:

#include <iostream>
#include <cmath>

using namespace std;

int main()
{
    // Defining Varriables
    string operation;
    double number1, number2;
    bool runapp = true;

    // get user input
    while (runapp == true)
    {
        cout << "Enter Operation (+,-,*, /, E): ";
        cin >> operation;

        // if else statement checking entered operation
        if (operation == "+")
        {
            cout << "Enter First Number: ";
            cin >> number1;
            if (cin.fail())
            {
                cin.clear();
            }
            cout << "Enter Second Number: ";
            cin >> number2;
            if (cin.fail())
            {
                cin.clear();
            }

            cout << endl;
            cout << "The Value is: " << number1 + number2 << endl;
        }
        else if (operation == "-")
        {
            cout << "Enter First Number: ";
            cin >> number1;
            if (cin.fail())
            {
                cin.clear();
            }
            cout << "Enter Second Number: ";
            cin >> number2;
            if (cin.fail())
            {
                cin.clear();
            }
            cout << endl;
            cout << "The Value is: " << number1 - number2 << endl;
        }
        else if (operation == "*")
        {
            cout << "Enter First Number: ";
            cin >> number1;
            if (cin.fail())
            {
                cin.clear();
            }
            cout << "Enter Second Number: ";
            cin >> number2;
            if (cin.fail())
            {
                cin.clear();
            }
            cout << endl;
            cout << "The Value is: " << number1 * number2 << endl;
        }
        else if (operation == "/")
        {
            cout << "Enter First Number: ";
            cin >> number1;
            if (cin.fail())
            {
                cin.clear();
            }
            cout << "Enter Second Number: ";
            cin >> number2;
            if (cin.fail())
            {
                cin.clear();
            }
            cout << endl;
            cout << "The Value is: " << number1 / number2 << endl;
        }
        else if (operation == "E")
        {
            cout << "Closing Application" << endl;
            runapp == false;
            break;
        }
        else
        {
            cout << "Invalid Response, Try Again" << endl;
        }
    }

    return 0;
}


That's all for this time. Peace 💣✌

Tuesday, June 20, 2023

Outlaw Alley: The WANTED Poster Generator !

 Hello, and Welcome to my Blog! 

If you're a returning visitor, sorry I was gone.


Quote of the Week:

You don't have enemies. The truth is that nobody has them.

-Thors

Hello, my loyal followers today! I have an application to show that I've created in preparation for a new event at SUNY Canton. The event's name is the Wild West Fest, and this application is called Outlaw Alley. It took me about 2 weeks to create this program, and it's pretty straightforward to the point even a 5-year-old could use it. 

The application consists of five screens. The title, name prompt, bounty prompt, taking the picture, and restarting. I'll go over a few of them below. The first screen is where the user is first told what they're looking at and actively conveys what the goal of the application is, as seen below.


Please forgive the shotty background, as the webcam is limited at the moment as this is running on a desktop. 😂

I have to give a special thanks to the GitHub user "matthewkayne" for providing the basis for the webcam portion of this project. I edited their source code by adding an additional method to the class for taking a picture and adding it to the Wanted poster.

Then after this screen, you will be prompted to enter your bandit name. I chose to be called 'Ol' Tan' because of the hat I was wearing, and 'Ol' White' might offend some people. Then it asks you to input your bounty. I put in the relatively high number of 10000, and then after submitting the number, you will be asked to take a picture. 


The one portion of taking a picture I'm proud of in this application is that it's nearly instant. This is compared to my previous project, the PPCC, where picture processing was incredibly slow.

After the picture is taken. OpenCV compiles all of the information from the application to generate a Wanted poster!

This is coded in Python and uses three main libraries.

-Tkinter

-OpenCV

-Pillow

The only way at the moment to try this out is to show up at SUNY Canton at the Wild West Fest. I'll be sure to drop more information soon. 

If you would like to test this out at your own event, please contact me at patrickmadon130@gmail.com

That's it for this week. Come back next week for more tech stuff from me.

-PEACE💣

Links Above 

GitHub Link:GreenyPM/OutlawAlley-WildWestFest: This is a WANTED Poster Generator made for the Wild West Fest 2023 (github.com)


Monday, February 27, 2023

C++ Returns as Immutable

 Welcome to my Blog!

Quote of the Week

I'd Rather Piss than Pink
-Matt

Hello, lovey people who come to read my blog! This is what I've been working on in the past week. I was mostly working on the gameshow. However, I did get a chance to slip in some C++ code. Huzzah we're finally back to learning C++! Let's get into it.

 Game Show:

So, to start I've designed a new logo for the show and generally cleaned up the UI a bit more. I'm taking a class on graphic design, I try to use principals of this to make my programs look, and I quote "less disgusting". Here's what the design looks like right now.

If you notice the top, it looks like I've got a professional logo done for it. I don't know how professional you could call it since I made it with an online text generator, but I think the colors mesh well.


C++ Code:

Now onto the more technical stuff! This week I started a new section of the "C++ all in one book for dummies." This section claims to focus on Functional Programming. Currently, I'm learning about the principles of what makes functional programming different. This includes understanding lambdas, working with "struct", constant data, the application state, and more. This is the first time I'm seeing new built-in header libraries being used. These are <fstream> and <algorithm>. I'm excited to learn more about this and use it in my future coding ventures.

Here's a snip it of code that I was working on.

 #include <iostream>

#include <fstream>
#include <algorithm>


using namespace std;


//Avoiding Use of State Directly
//Application state is a condition that occurs when the application performs tasks that modify global data 
//It doesn't have one when using functional programming, which is good and bad. It's bad as the application has no memeory


int lineCount1(string filename) {
int lineCount = 0;
char c = ' ';
ifstream thisFile(filename);
while (thisFile.get(c)) {
if (c == '\n') lineCount++;
}
thisFile.close();
return lineCount;
}
int lineCount2(string filename) {
ifstream thisFile(filename);
return std::count
(istreambuf_iterator<char>(thisFile), istreambuf_iterator<char>(), '\n');
}
int main() {
const string filename = "ToeBeans.txt";
cout << lineCount1(filename) << endl;
cout << lineCount2(filename) << endl;
return 0;
}


//Making Imutable or Constant Data 
/*
struct Immutable {
int val{ 7 };
};
int main() {
const int *test1 = new int(5);
*test1 = 10;
const int test2{ 6 };
test2 = 11;
const Immutable test3;
test3.val = 12;
//The code should give an error as they should be immutable with means they cannot be re-assigned.
cout << *test1 << test2 << test3.val << endl;
return 0;
};
*/

That will conclude this week's post. I hope you enjoyed reading it! The main goal of this site is to show myself how far I've come about a year from now, so I really appreciate you reading this. It's like you're on a coding journey with me! But being a nerd aside, I'll see you guys next week!

-Peace💣 

Monday, February 20, 2023

Nerd's Hour - A Japanese Gameshow Americanized.

 Welcome to my Blog!


This is Nerd's Hour a Game Show that will Appear at the Comic-Con!

So first ahhhhhh IT'S CRAZY THAT I'M RUNNING A GAME SHOW, RIGHT? Oh, before I forget and start rambling with code here's your quote of the week.

Quote of the Week:
A dollar makes me holler!

-A Sorority Girl at the Cookie Sale.

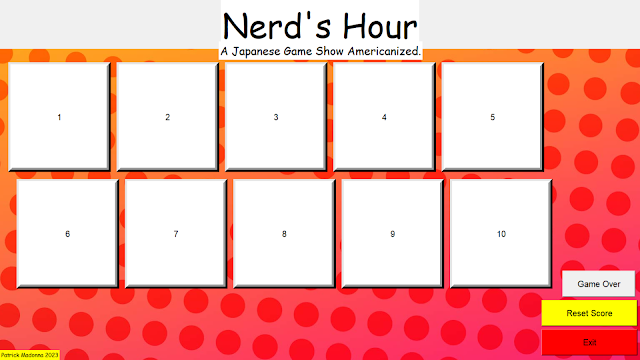
Hello everyone; welcome back to my blog. I've decided to continue my non-voluntary strike of learning C++ and do actual projects in Python with Tkinter. The picture above is my game show's layout board or main menu. I got the idea for it while attending a Comic-Con in Canada. The land of the maple syrup that I love so much (I'm American).


The game works as follows. There are ten panels on the board, and a contestant comes up to the board and chooses one. After choosing one, they are prompted with any of the following categories.


Trivia - Audio Question - Guess that Silhouette - Videogame Challenge - Brutal Question


If they get the question right, they get a point, and the block disappears. They then move on to choose another question on the board. Until they get a question wrong, they will "lose their streak," as I like to say. If they had the highest streak, they stay up top on the "Winner's Couch". This is until someone beats their streak. If their streak gets beaten, they get kicked off the couch but sent away with some prizes. The whole goal is to stay on the sofa till the end of the show, so you can get the Grand Prize, which I will keep a secret for now 🤐.


Some people may say people are going to metagame and wait till the last minute to steal it away...

You'd be right if I were planning on handpicking people. This game's contestants will be chosen out of entire chance. Every audience member will be given a card with a number on it. Then I'll pull a random number within that range from a python script. It will look somewhat simple like this:


import random


maxValAudience = int(input())


print(random.randint(0,maxValAudience+1))


*Kids and Adults at home, this simple Python code can be used! (on the house 😉)


This will give everyone an equal chance to participate in the competition. Now as I said in the beginning, I did promise I'd write about the code. Here's your fix code heads. This is made up of 4 Python using the Pandas, Tkinter, and OpenCV libraries. I'll only show you a snippet of them for right now so as not to spoil all the questions for anyone participating in the show. If you'd like to purchase the rest, please refer to my email "patrickmadon130@gmail.com".


Snippet from ques.py
#This is where the information for the question contents and the button commands lie.
from tkinter import *
import pandas as pds
import Counter
import musicShadows
import os


def quesSel(Cbutton,number):


successVal = "Correct!"
failVal = "Wrong."
button1x = 1300
button1y = 550
button2y = 700

ques = Tk()
ques.title("Question")
ques.attributes('-fullscreen', True)
ques.config(background='Black')
ques.resizable(False, False)

if number == 0: #Trivia
file = "TriviaQuestions.xlsx"
fr = open("Counters\\trivia.txt")
value = int(fr.read())
fr.close()
imageref = musicShadows
# Read Excel and select a single cell (and make it a header for a column)
Ques = pds.read_excel(file, 'Sheet1', index_col=None, usecols="A", header= value,nrows=0)
choices = pds.read_excel(file, 'Sheet1', index_col=None, usecols="B", header= value, nrows=0)
Qvalue = Ques.columns.values[0] # this must always be at 0
Cvalue = choices.columns.values[0]
# Title
C = Canvas(ques, bg="#d0c0cc", height=500, width=1500)
C.place(x=10, y=10)
titleText = Label(ques, text="Trivia Question!", fg = "Green",font=('Californian FB', 80), bg="White")
titleText.place(x=10, y=40)
questionText = Label(ques, text=Qvalue, font=('Helvetica', 50), bg="#d0c0cc")
questionText.place(x=10, y=180)

# Text
qBox = Canvas(ques, bg="grey", height=300, width=1250)
qBox.place(x=20, y=550)
questionText = Label(ques, text=Cvalue, font=('Helvetica', 30), bg="grey")
questionText.place(x=30, y=580)

#Real Answer
# Reveal Button
reveal = Button(ques, text="Reveal", font=('Helvetica', 15), height=5, width=20, command=lambda
: imageref.revealAns(value,ques,file))
reveal.place(x=1000, y=550)


Here's a Picture of the one of the question prompts.


Hopefully, this week, I'll be working on structures of C++ again, but I hope you enjoyed a little showcase of my new project! Any feedback would be greatly appreciated, as long as it's constructive.

Until Next Time, Peace! 💣

Monday, February 13, 2023

Constructing A Gameshow + Finalizing the Card the Creator

 Welcome to the Blog!


Quote of the Week:
If I think my brain is Michael Jordan, that means I'm Michael Jordan
-An Online Classmate 

This previous week was pretty hectic, so I didn't get to do any lessons in C++. However I did finalize the designs for the Personal Pokémon Card Creator. I've also been working on a gameshow project called "Thrown Remotes". The screenshot above is a very early rough draft of how a question will look. 

The finalized version of the PPCC outputs a card front and back onto a webpage specific to it. This includes the weaknesses and resistances of the card and a backing that looks similar to the actual Pokémon card, with a degenerate easter egg.

This is a drastically shorter post than usually, but I hope you guys can wait until next week, when we'll get back into the swing of things. 

-Peace💣


Monday, February 6, 2023

Code Theory and Mediating a Code Car.

 Welcome to the Blog!


This previous week we mainly focused on code structures, such as "Singleton" and "Mediators." This was harder to grasp than pointers, believe it or not. I get them in concept but using them in practice might prove to be a harder beast to tame. Let's get into it.

Quote of the Week:
Yu-gi-oh is like playing Pokémon without the fun.
-Game Club Member.

So we first started with a singleton. This structure mainly focused on making sure there was only one instance of the code running at once or determining how many instances of the code are currently running. I made my own version of their "planets" code. This was to make it easier to understand and give me more experience with the structure. I'll put both in.

My Code:
#include <iostream>

using namespace std;

class instanceObj {
private:
string catName = "Default";
int instanceCounter = 0;
public:
instanceObj(string name);
int increase(int val);
int showCount();
};

instanceObj::instanceObj(string name)
{
catName = name;
cout << "Let's Begin" << endl;
}

int instanceObj::increase(int val)
{
instanceCounter += val;
return 0;
}

int instanceObj::showCount()
{
cout << catName << " Jumped " << instanceCounter << " Times!" << endl;
return instanceCounter;
}


int main() {
instanceObj catJump("Gerald");
catJump.increase(4);
catJump.showCount();

};

Their Code:

class Planet {
private:
static Planet* inst;
Planet(string name) {
cout << "Welcome to " << name << endl;
} // Pre-Constuctor
~Planet() {} //Deconstructor
public :
static Planet* GetInstance(string name);
};

Planet *Planet:: inst = 0;

Planet* Planet::GetInstance(string name) 
{
if (inst == 0) {
inst = new Planet(name);
}
return inst;
}


int main() {
Planet *MyPlanet = Planet::GetInstance("Earth");
cout << "MyPlanet address: " << MyPlanet << endl;

Planet* MyPlanet2 = Planet::GetInstance("Uranus");
cout << "MyPlanet address: " << MyPlanet2 << endl;
return 0;
}


Then I proceeded to go through observers and mediators, theses were initially pretty difficult to grasp, but in the end, I found that they're pretty self-explanatory. The observers look into your code and decide if anything is going unexpectedly or if it takes information from a class to put inside another. The mediators act as a backbone, where you make a flowchart esk diagram and make the program and classes from that. 
The example they gave was pretty lengthy, in which you were to design a hypothetical car. Due to the vast size of the example, I'll only include the header file. This should give you an idea of how big the system is.

Code:

#ifndef MEDIATOR_H_INCLUDED
#define MEDIATOR_H_INCLUDED

class CarPart;
class Engine;
class Electric;
class Radio;
class SteeringWheel;
class Wheels;
class Brakes;
class Headlights;
class AirConditioner;
class Road;

class Mediator {
public:
Engine* myEngine;
Electric* myElectric;
Radio* myRadio;
SteeringWheel* mySteeringWheel;
Wheels* myWheels;
Brakes* myBrakes;
Headlights* myHeadlights;
AirConditioner* myAirConditioner;
Road* myRoad;
Mediator();
void partChanged(CarPart* part);
};

class CarControls : public Mediator {
public:
void startCar();
void stopCar();
void pushGasPedal(int amount);
void releaseGasPedal(int amount);
void pressBrake(int amount);
void turn(int amount);
void turnOnRadio();
void turnOffRadio();
void adjustRadioVolume(int amount);
void turnOnHeadlights();
void turnOffHeadlights();
void climbHill(int angle);
void descendHill(int angle);
void turnOnAC();
void turnOffAC();
void adjustAC(int amount);
int getSpeed();
CarControls() : Mediator() {}
};

#endif // MEDIATOR_H_INCLUDED

Other than that, nothing code focused really happened. Other than new ideas for robots and tweaking some older projects here and there. Maybe next week, I'll post about one of those.

Until Next Time, Peace!💣

Monday, January 30, 2023

Shenagans and C++


Quote of the Week

"Curiosity is about Wisdom."

 - Professor Wang

Let's take a look back at the previous week and what we accomplished in code. We're still on that C++ grind and it's the first week of my sixth semester in college.

As you can see from the picture above, we first started by identifying how to use class objects and methods, using a theoretical dog. His name is Fred, say HELLO!🐶 

class MyDog {

protected: //This is the perfered method of making non-publically accessable values in C++ 

string _name;

int _weight = 300;

bool _isHealthy = false;

public:

//Properties

string getName() 

{

return _name;

}


int getWeight()

{

return _weight;

}


void setWeight(int weight) 

{

if (weight > 0) 

{

_weight = weight;

}

}


void setIsHealthy(bool isHealty) 

{

if (_weight > 200) 

{

_isHealthy = false;

}

else 

{

_isHealthy = true;

}

}


//Methods

MyDog(string name);

void DoDogRun();

};


MyDog::MyDog(string name) 

{

if (name.length() == 0) throw "Error: Couldn't create my Dog.";


MyDog::_name = name;

}


void MyDog::DoDogRun() 

{

if (MyDog::_isHealthy)

cout << MyDog::_name << "is running!" << endl;

else if (MyDog::_weight > 200)

cout << MyDog::_name << "is too fat to run!" << endl;

else

cout << MyDog::_name << "Is unhealty; see vet first" << endl;

}


int main() {

MyDog* thisDog;


try {

thisDog = new MyDog("Fred");

}

catch (const char* msg) {

cerr << msg << endl;

return -1;

}


cout << thisDog->getName() << "needs excercise" << endl;

thisDog->DoDogRun();


thisDog->setWeight(100);

thisDog->DoDogRun();


thisDog->setIsHealthy(true);

thisDog->DoDogRun();


delete thisDog;

thisDog = 0;


return 0;

}


This code serves the purpose of more practice using classes and pointers to hold instances of the object.

I then started working on trying to better understand derived classes and how they function. I have somewhat of an idea out of the gate, having some experience with Python classes. However, it works a little different with its syntax. To start let me tell you what a derived class is. It's a class that shares protected information with a parent class, making it a sort of child. This derived class can be invoked separately from the base class when written properly. It's used for multi-stepped projects or to keep regular users from accessing private variables you wouldn't want to be changed.

The example given to explain this is probably one of my favorites, as it involves frozen pizza haha.

class FrozenFood {

private:

int Price;

protected:

int Weight;

public:

FrozenFood(int APrice, int Aweight);

int GetPrice();

int GetWeight();

virtual void BakeChemistry();

};


class FrozenPizza : public FrozenFood { //This a good example of a derived class from the Frozen Food

protected:

int Diameter;

public:

FrozenPizza(int APrice, int AWeight, int ADiameter);

void DumpInfo();

void BakeChemistry();

};


class DeepDishPizza : public FrozenPizza {

private:

int Height;

public:

DeepDishPizza(int APrice, int AWeight, int ADiameter, int AHeight);

void DumpDensity();

void BakeChemistry();

};


//Frozen Food Functions

FrozenFood::FrozenFood(int APrice, int AWeight) {

Price = APrice;

Weight = AWeight;

}


int FrozenFood::GetPrice() {

return Price;

}


int FrozenFood::GetWeight() {

return Weight;

}


void FrozenFood :: BakeChemistry() 

{

cout << "To Bake it put into Oven for 20-40 Minutes" << endl;

}


//Frozen Pizza Functions

FrozenPizza::FrozenPizza(int APrice, int AWeight, int ADiameter) : FrozenFood(APrice, AWeight) {

Diameter = ADiameter;

};


void FrozenPizza :: BakeChemistry()

{

cout << "To Bake it put into Oven for 20 Minutes" << endl;

}


void FrozenPizza :: DumpInfo() {

cout << "\tFrozen pizza info" << endl;

cout << "\t\tWeight:" << Weight << "ounces" << endl;

cout << "\t\tDiameter" << Diameter << " inches" << endl;

}


//DeepDish Pizza Functions

DeepDishPizza::DeepDishPizza(int APrice, int AWeight, int ADiameter, int AHeight) : FrozenPizza(APrice, AWeight, ADiameter) {

Height = AHeight;

}


void DeepDishPizza::DumpDensity() {

//Calculate the pounds per cubic food of deep dish pizza

cout << "\tDensity: ";

cout << Weight * 12 * 12 * 12 * 14 / (Height * Diameter * 22 * 16);

cout << " pounds per cubic foot" << endl;

}


void DeepDishPizza :: BakeChemistry()

{

cout << "To Bake it put into Oven for 30 Minutes" << endl;

}


void Bake(FrozenFood *) 

{

cout << "Cooking" << endl;

}


int main() 

{

cout << "Thin crust pepperoni" << endl;

FrozenPizza pepperoni(450, 12, 14);

pepperoni.DumpInfo();

pepperoni.BakeChemistry();

cout << "\tPrice " << pepperoni.GetPrice() << " cents" << endl;


cout << "Deep Dish extra-cheese" << endl;

DeepDishPizza extracheese(550, 21592, 14, 3);

extracheese.DumpInfo();

extracheese.DumpDensity();

extracheese.BakeChemistry();

cout << "\tPrice: " << extracheese.GetPrice() << " cents" << endl;

return 0;

}


That's all I would like to share for this week, next week expect something a little more theoretical, like code design patterns. Until then, Peace 💣

DOCTOR! The Calculator is Terminal!! The C++ variety ;)

    Hello, and Welcome to my Blog!  If you're a returning visitor, ...Hello Again! Quote of the Week: ..but fear itself isn't worthy...